Introduction
NomenclatureAdobe has four products called "Photoshop."
Photoshop CS3 is the big professional pixel-by-pixel graphics program that's become a household verb since 1990. CS3 comes in several strengths.
Lightroom is more formally called "Adobe Photoshop Lightroom 2." This is what I'm reviewing in this article. Most people just call it "Lightroom."
Photoshop Elements is a basic version of Photoshop CS3 for picture editing. It is quite flexible at a bargain price. I have not used the recent versions, however previous versions have had a very large portion of Photoshop's abilities while being even even easier to use than the full version of Photoshop. The latest versions of Photoshop Elements even do web galleries and Flash galleries.
Photoshop Express is a free online version.
This ReviewCameras are easy to review. Every camera is designed to do pretty much the same thing as every other camera: take pictures. With decades of experience, it's easy for me to use a camera and then speak volumes about its performance for almost every kind of use.
Software is very difficult to review. Every piece of software is designed to do something completely different. Even if two pieces of software are designed for the same purpose, every piece of software will do it differently.
I work in Photoshop CS2 so much all day and night that I actually have had dreams where all I do is work in Photoshop CS2. That's scary, but even I use only a small fraction of CS2's total capabilities.
Everyone has their own way of working their photos. I use iView to sort, organize and pick my photos. If I print them, my JPGs usually go straight to my local Costco's photo kiosk without editing. If I need to edit an image, or simply resize and brand it with my © for this website, I use Photoshop CS2. I use Dreamweaver 8 to put it all together into this website.
Because you all want to know what I think of Lightroom, I got a copy to evaluate. There is no way I could spend months working in it all day, every day to cover every possible nuance.
If you're already a Lightroom 2 expert, there isn't much I'll be able to tell you that you don't already know. I have used it enough to let you know what I think of it overall, and as compared to other software. That's the point of this review.
Lightroom 2Personally, I haven't used use Lightroom much, but half of my friends use it a lot, and every single one who uses Lightroom loves it. (I explain my workflow in detail if you care.)
Unlike most products, which do a little customer research and then hide out for 18 months blindly developing what some guy in a big company thought we wanted, Lightroom has been developed with constant, continuing and intense feedback from all users via Adobe's beta system.
This is why I don't need to spend much time trying to comment on how I like the program. Unlike most products in this world, Lightroom is an amalgam of what we all wanted. This is why photographers love it so much.
Lightroom 2 just works. It installed instantly, and everything is just obvious to figure out. I never had to resort to any help or training; I just fiddled around and it worked.
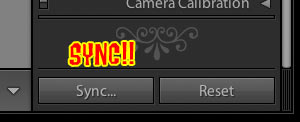 The Sync Button.
The biggest reason I hear photographers love Lightroom is because it's trivial to apply the same correction, regardless of how complex it may be, to as many other images as you like. If you want to lighten and change the WB on 100 images after you set the first one, just hit "Sync" and it applies the same correction to them all. Make a mistake or want to tweak the tweak? No problem, just do it: none of the changes are permanent.
Lightroom isn't just a sorting program. Lightroom is about five different programs all rolled into one, all of which work extremely well together.
From what I can see, Lightroom 2 is the world's first single piece of software that could be the only piece of photo software a moderately serious photographer might ever need.
LibraryLightroom sorts. That's the Library part. Personally, I prefer iView for this, but that's just me.
DevelopLightroom edits and optimizes. That's the Develop part. I use Photoshop CS2 for this, which can do more, but is a lot more difficult to use.
The biggest single addition in Lightroom 2, that finally makes it a program for real photographers, is that it can do localized burning, dodging and corrections.
Lightroom 1 was only a kid's program since it couldn't do any localized corrections. The ability to alter different parts of an image has been the most critical part of being a photographer since the 1800s.
SlideshowLightroom does slideshows, the Slideshow part.
PrintLightroom optimizes for printing, and can create multiple images on pages. That's the Print part. I don't use this.
WebLightroom not only can make web galleries, it can upload these pages via FTP all by itself! You don't need any other program for uploading.
Just enter your own web server information, or you can publish directly from Lightroom 2 to your SmugMug, Picassa, Flickr and other accounts.
Lightroom can make HTML galleries, which are the same type I do by hand the hard way in Dreamweaver 8, as well as make spiffy Flash (animated) galleries.
Lightroom is loaded with nice graphics, much nicer than the galleries I do manually for myself.
Lightroom 1I tried Lightroom 1.0 back in 2007. It was still klunky, at least in the early version I tried, and I never got too excited about it.
Lightroom 2 is a huge improvement over Lightroom 1. Not only does everything just work better in Lightroom 2, the lack of localized editing made Lightroom 1 no more than a toy.
InstallationLightroom 2.0 is easy to install and start using.
After the super-easy installation, it was easy to type in my serial number and just go.
I wish all software was this easy. I doubt that I had to spend as much as 60 seconds to get it loaded, installed, up and running.
Lightroom is an efficient program. The whole package only needs about 80 MB of hard disk space. 80 MB is the size of a few RAW files. Heck, to you people who still use bloated software which measure hard disc wastage in gigabytes, 80 MB is only 0.08 GB!
You can install Lightroom and not even notice any loss of hard drive space, even on a computer way too old to run it. Thank you, Adobe!
OperationLightroom is a dynamic program, meaning everything is calculated on the fly as you work.
The advantage is that you never have to hit Reload to see what you've got or what you're doing, but the disadvantage is that it uses a lot of computing power just to scroll the screen or look at images at 100%.
I have a suspicion that I'm overly sensitive to this, but my biggest complaint is that images and thumbnails always take a moment to pop in. If you scroll the Library view, it can take a second to redraw the thumbnails sharply. This drives me up a wall, and is one reason I would not use Lightroom for myself, but I've never heard anyone else complain. By comparison, a program like iView which generates catalogs, takes a while to catalog the first time, but runs instantly every time after that.
If you want to sort through images faster at 100%, go to LIBRARY > PREVIEWS and select RENDER 1:1 Images. This way Lightroom will render these in advance, which is especially helpful for sorting through raw images. Otherwise, it takes a moment to load each image as you're trying to flick through them at 100%. Pre-rendering these at 1:1 makes your Lightroom library, saved in your Pictures/Lightroom folder on Mac, much larger, and also takes a while to crunch on all the images.
After I did all this, it still could take a moment to draw each image at 100%, but at least raw files didn't take any more time than JPGs.
SelectingMost programs, just like LIghtroom, allow you to select between showing all your thumbnails, or just one big image on screen.
Lightroom also has a 2-up feature where you can see before and after (adjustments), or compare a "picked" image to others you might prefer.

Lightroom has a very flexible feature, called "Survey View," that allows us to show any number of images at the same time, all made to fit the screen.
We can select 10 "maybes" (CMD+Click on each one to select while in Grid View), and show them by hitting the Survey View button. All 10 then show on-screen. As we dump the weak ones (CMD+Click to remove them from the selection), the survivors grow to fill the remaining space on screen. Press "P" to mark them as a pick.
Photo Editing: The Develop PaneThis is where the fun happens. I'm particularly impressed that Lightroom seems to do the best job of any software I've used, including Photoshop CS2, when it comes to how well the sliders do what we need them to do.
Sliders like Exposure, Saturation, WB and Fill Light just give great results, without all the fiddling needed with curves in Photoshop CS2. These sliders are decades beyond Photoshop's primitive Lighten and Darken controls from the 1990s, or what conjures up easily with Photoshop CS' Curves.
Even working in Photoshop CS2 all day, I see myself using Lightroom 2 just for these superb adjustment tools. (Note: I'm still on old CS2. Lightroom is designed to integrate directly with CS3, and will work even better along with it.)
These exposure and WB adjustments work the same in JPG and raw. It's only been an old-wives tale that JPGs don't allow for the same corrections as raw.
PresetsIf you find you have a favorite set (or sets) of adjustments (Develop settings), you can save and recall these as Presets.
Whacky Mouse Tricks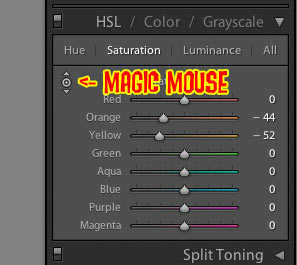
See the little doorbell with little triangles on top and bottom? Select an adjustment, click the magic mouse icon, and when you put the mouse over the image and click, moving the mouse up and down will change that adjustment for the image!
Easy Localized Adjustments!One of the most basic and critical things I do all the time in Photoshop CS2 is to use adjustment layer masks for burning and dodging. These are critical to even the most basic photographic expression. Photographers have been doing this since the 1800s, but sadly, it's very complicated to do properly in Photoshop CS2 or other software.
Most photos benefit greatly by darkening the corners and lightening the center of attention. This puts the viewer's eye where it needs to go.
The photo below looks normal. You first see the kid's snarled face, a moment later notice that he's eating, and then notice the food tray. This is how the photo is supposed to read.
I had to lighten his face so your eye went there first. I also darkened the rest to be less distracting. Roll your mouse over to see how it looked before it was burned and dodged. THe out-of-camera original looks horrible by comparison.
This "horrible" is the result you'll get from any and every software that cannot make local adjustments. This creative use of lightening and darkening different parts of an image is what makes Ansel Adams immortal.

 Baby Ryan in a speed-eating contest. Roll mouse over to see as shot.
It's easy in Lightroom 2. Hit the button with the dot around it, and draw on your image. You'll see the diameter of the "brush" with which you're drawing on your image, and at default, it will lighten the areas over which you draw.
This mask box is where you set what happens as you paint with the mouse, and where you set the size of the brush.
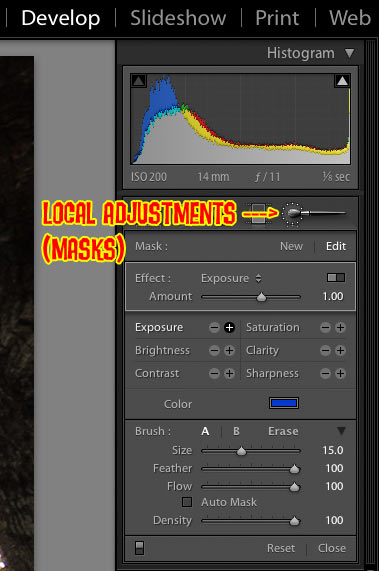
You can go back and edit the areas affected later (use the Erase option), and you can change the amount of adjustment (just change the sliders).
Lightroom 2 has also made selections much easier. Use the Auto Mask option to try it.
Grad FiltersTo the left of the Local Adjustments control is a grad filter control.
Grad, or graduated, filters allow you to darken or lighten tops or bottoms of images.
The grad filters are very flexible.
Grad filters are usually used to darken skies.
XMP Data: Save your JPGs unchanged with encoded, non-destructive edit dataThe changes you've made to an image, even in JPG, can be saved as XMP data as part of the file.
JPG, TIFF and many formats (except raw) have the native ability to store XMP information along with the image.
When read by normal software, you get your unedited image.
When read by the program with which you made the non-destructive edits, like Lightroom, that software will apply your edits and allow you to alter them further.
In other words, you can save your files to outside of Lightroom, and if you bring them back in later, will be right where you left off.
Raw ProfilesRaw images are rendered without regard to how your camera was set.
I like to shoot with my camera's saturation cranked. This means that the raw versions of these images look dull in Lightroom, since Lightroom ignores what I set in-camera.
If you prefer raw images to look more like what you set in-camera, Adobe offers some canned raw profiles which will simulate what you had in-camera. They won't read every little setting you may have dialed-in in your Nikon Picture Controls or Canon Picture Styles, but they will get you in the ballpark for presets like PORTRAIT, VIVID and NEUTRAL.
You can find these at Adobe Labs.
Likewise, some more advanced users may like to create a raw profile of their own to apply to each raw image. Look for the Raw Profile Editor at Adobe Labs.
ComplaintsLightroom works great. My issues below are largely irrelevant to you, because they are simply how I'd prefer Lightroom to be designed, as opposed to how Adobe took feedback from zillions of real users to give us all what we really want.
I prefer, and am used to, using iView to sort through my images.
I prefer iView because I can have the grid display show me exactly what I do (or don't) want to see about an image's EXIF, and because I can maximize the amount of space used for thumbnails and minimize the screen space wasted as borders around images. I can fill the screen with zero borders if I want. I can get more and larger thumbnails on screen with iView compared to Lightroom's Library pane, which means I can see more images better and faster in grid view, which helps me sort through thousands of images faster. To me, time really is money when it comes to sorting.
Likewise, in iView not only do I have complete control over a zillion aspects of how the Library pane is displayed (and with what data), I can save each of these display settings and recall them instantly depending on what I'm sorting. Lightroom just doesn't have this flexibility.
Lightroom takes too long to redraw the screen as I scroll in the Library pane. I have zero tolerance for anything that slows down zipping through my files. I expect my computers to show me my images, not to be fuzzy for a moment while the software figures it out. Those lost moments, multiplied by hundreds of times a day, cost me money. I'm on a quadruple-processor 2.5 GHz G5 Mac with 4.5 GB of RAM, and iView is faster for scrolling though grid (Library) views on my 800 MHz laptop than Lightroom is on my quad G5.
My cameras shoot video and audio files. iView deals with all these files, while Lightroom ignores my videos, and ignores my audio notes. Audio notes are important; that's why pro cameras record them. Lightroom can't handle them.
So what? I use a different tool than Lightroom for sorting. It's very important to me, but I'm not you.
CMD+W not only closes Lightroom on Mac, it quits it!
Recommendations back to top
For photo editing, I've been a full Photoshop user since the mid-1990s. Now, with Lightroom 2's ability to do local corrections, it's probably all that even serious photographers need. For most photographers, Lightroom 2 is probably better then Photoshop CS3 because most photographers are more likely to be able to figure out the adjustments in LIghtroom 2.
As a web designer, I'm sticking to the graphic abilities in full Photoshop, mostly because I already know how to do them in my sleep. For normal people who will probably never be comfortable with Photoshop CS3's adjustment layer masks, required for even basic proper burning and dodging in Photoshop, Lightroom is superior because normal people will be able to figure it out.
I have a lot of specialized editing needs (remember I run a website, too), and even dream in Photoshop CS2. I have no reason to change my workflow because a new tool comes out.
For most normal people, yes, get Lightroom 2! It's a lot more than just an editing and sorting tool.
I do this for a living. I'm shooting or, in my computer, all day, every day, so I get whatever tools I need to let me get the job done as fast as possible.
For me, iView is the best way to lay out sort and select what I shot.
For normal people, Lightroom 2 can replace a host of more expensive programs that most people will never figure out.
PLUG
I support my growing family through this website.
If you find this as helpful as a book you might have had to buy or a workshop you may have had to take, feel free to help me continue helping everyone.
If you've gotten your gear through one of my links or helped otherwise, you're family. It's great people like you who allow me to keep adding to this site full-time. Thanks!
If you haven't helped yet, please do, and consider helping me with a gift of $5.00.
The biggest help is to use these links to Adorama, Amazon, B&H, Ritz, and J&R when you get your goodies. It costs you nothing and is a huge help to me. These places have the best prices and service, which is why I've used them since before this website existed. I recommend them all personally.
Thanks for reading!