在GTA4中使用ASI插件,极有可能需要用到以下内容,即键盘按键的实际程序代码,即便自己不会也不用亲自做asi程序,也会在使用不同mods中因为按键冲突而需要自己亲自修改,那么,仔细看吧:
Key Code Constants
按键 代码值 描述
Key Codes(综合功能键)
vbKeyLButton 1 Left mouse button
vbKeyRButton 2 Right mouse button
vbKeyCancel 3 CANCEL key
vbKeyMButton 4 Middle mouse button
vbKeyBack 8 BACKSPACE key
vbKeyTab 9 TAB key
vbKeyClear 12 CLEAR key
vbKeyReturn 13 ENTER key
vbKeyShift 16 SHIFT key
vbKeyControl 17 CTRL key
vbKeyMenu 18 MENU key
vbKeyPause 19 PAUSE key
vbKeyCapital 20 CAPS LOCK key
vbKeyEscape 27 ESC key
vbKeySpace 32 SPACEBAR key
vbKeyPageUp 33 PAGE UP key
vbKeyPageDown 34 PAGE DOWN key
vbKeyEnd 35 END key
vbKeyHome 36 HOME key
vbKeyLeft 37 LEFT ARROW key
vbKeyUp 38 UP ARROW key
vbKeyRight 39 RIGHT ARROW key
vbKeyDown 40 DOWN ARROW key
vbKeySelect 41 SELECT key
vbKeyPrint 42 PRINT SCREEN key
vbKeyExecute 43 EXECUTE key
vbKeySnapshot 44 SNAPSHOT key
vbKeyInsert 45 INS key
vbKeyDelete 46 DEL key
vbKeyHelp 47 HELP key
vbKeyNumlock 144 NUM LOCK key
KeyA Through KeyZ(字母区按键)
vbKeyA 65 A key
vbKeyB 66 B key
vbKeyC 67 C key
vbKeyD 68 D key
vbKeyE 69 E key
vbKeyF 70 F key
vbKeyG 71 G key
vbKeyH 72 H key
vbKeyI 73 I key
vbKeyJ 74 J key
vbKeyK 75 K key
vbKeyL 76 L key
vbKeyM 77 M key
vbKeyN 78 N key
vbKeyO 79 O key
vbKeyP 80 P key
vbKeyQ 81 Q key
vbKeyR 82 R key
vbKeyS 83 S key
vbKeyT 84 T key
vbKeyU 85 U key
vbKeyV 86 V key
vbKeyW 87 W key
vbKeyX 88 X key
vbKeyY 89 Y key
vbKeyZ 90 Z key
Key0 Through Key9(键盘区数字键)
vbKey0 48 0 key
vbKey1 49 1 key
vbKey2 50 2 key
vbKey3 51 3 key
vbKey4 52 4 key
vbKey5 53 5 key
vbKey6 54 6 key
vbKey7 55 7 key
vbKey8 56 8 key
vbKey9 57 9 key
Keys on the Numeric Keypad(小键盘区数字键)
vbKeyNumpad0 96 0 key
vbKeyNumpad1 97 1 key
vbKeyNumpad2 98 2 key
vbKeyNumpad3 99 3 key
vbKeyNumpad4 100 4 key
vbKeyNumpad5 101 5 key
vbKeyNumpad6 102 6 key
vbKeyNumpad7 103 7 key
vbKeyNumpad8 104 8 key
vbKeyNumpad9 105 9 key
vbKeyMultiply 106 MULTIPLICATION SIGN (*) key
vbKeyAdd 107 PLUS SIGN (+) key
vbKeySeparator 108 ENTER (keypad) key
vbKeySubtract 109 MINUS SIGN (-) key
vbKeyDecimal 110 DECIMAL POINT(.) key
vbKeyDivide 111 DIVISION SIGN (/) key
Function Keys(功能键F1~F12)
vbKeyF1 112 F1 key
vbKeyF2 113 F2 key
vbKeyF3 114 F3 key
vbKeyF4 115 F4 key
vbKeyF5 116 F5 key
vbKeyF6 117 F6 key
vbKeyF7 118 F7 key
vbKeyF8 119 F8 key
vbKeyF9 120 F9 key
vbKeyF10 121 F10 key
vbKeyF11 122 F11 key
vbKeyF12 123 F12 key
vbKeyF13 124 F13 key
vbKeyF14 125 F14 key
vbKeyF15 126 F15 key
vbKeyF16 127 F16 key
2009年1月24日星期六
2009年1月23日星期五
Grand Theft Auto IV TweakGuide
Grand Theft Auto IV TweakGuide
written by Ettans @ iv-scripting.pri.ee
Update: New information in Part 2 concerning FarClp @ 3500.00
Part 1: Patching the files
First thing you should do, is download the GTA IV Magic Patcher by aru, in order to edit the files. Now, once you've downloaded and extracted it, open it and you'll see this:

If you haven't already patched your files, click on Validate Files, once done, click on Apply Patch. Now you can edit your GTA IV files and you'll also have backups of every file, with .magic as their file extension. You can revert the files anytime, by clicking on Verify and then Recover. You can now close the program.
Part 2: Changing the view-distance
That was quite easy, wasn't it? Browse to your Grand Theft Auto IV\pc\data folder and open the file named timecyc.dat. I suggest you use Notepad++ for the editing, since it'll look very messy in the default Notepad. Once you have the file open, look for the fiel called "FarClp", this controls the distance from which buildings, trees etc. are drawn at. The smaller the value, the shorter the view-distance. The default value is 1500.00, which is very big and quite pointless. To change the view-distance, simply change the value to a smaller one, I use 500.00 personally. If you're either too lazy to change it or whatever your reason is, I've attached the edited file at the bottom of this thread.
Comparison screenshots:
FarClp: 3500.00

Note: This gave me about +5-8 FPS, I suggest you try it out. I'm not entirely sure, but I think this has got something to do with PreFetch.
FarClp: 1500.00 (Default value)

FarClp: 750.00

FarClp: 500.00

In-game settings used:

Note: All screenshots were taken at the same place, time and weather, on-top of the GetALife building.
Download timecyc.dat (FarClp 3500.00)
Download timecyc.dat (FarClp 750.00)
Download timecyc.dat (FarClp 500.00)
Note: Extract it using WinRar or any similar program and place the file in your Grand Theft Auto IV\pc\data folder.
Part 3: Disabling shadows
Disabling the shadows doesn't have any significant impact on the games performance, but it might be useful for you if you're really struggling with the FPS. In order to disable the shadows, you should first download Alice by Alexander Blade. Extract the file and place the Alice folder in your main Grand Theft Auto IV folder. To disable the shadows, you can either make the script yourself, or download the one I made, using Alexander Blade's example script(s). To re-enable the shadows, simply delete the disable_shadows.lua in your Grand Theft Auto IV\Alice folder.
Shadows: Enabled

Shadows: Disabled

Note: All screenshots were taken at the same place, time and weather.
Download disable_shadows.zip
Part 4: Lowering bloom intensity
Currently there's no way to completely disable the bloom in Grand Theft Auto IV, but you can lower it's intensity. To do this, browse to your Grand Theft Auto IV\common\data folder and open the file called visualSettings.dat. Open the file and find the following names:
misc.BloomIntensityClamp.HD
misc.BloomIntensityClamp.SD
misc.BloomIntensityClamp.SD.ps3
Simply change their values to 0.00. If you don't want to edit the values yourself, download the visualSettings.rar at the bottom of this part and extract it to your Grand Theft Auto IV\common\data folder.
Bloom intensity: Default
Bloom Intensity: 0.00/Disabled

Note: All screenshots were taken at the same place, time and weather.
Download visualsettings.zip
Part 5 (Optional): Lowering the amount of rain particles
A lot of people are having trouble playing Grand Theft Auto IV with it's rainy weather, this is caused by the amount of it's particles (mostly). I can't guarantee that this will give you any performance boost, but It did make my gameplay smoother. To change the amount of rain particles, browse to your Grand Theft Auto IV\common\data folder and open the file called visualsettings.dat. Find the following fields there:
rain.NumberParticles.ps3
rain.NumberParticles
Here are the values I use myself:
rain.NumberParticles.ps3 256
rain.NumberParticles 1024
So, that concludes my Grand Theft Auto IV TweakGuide. Thanks a lot for reading, hopefully this tweak will help some people. If you want to post this on your forums/website, please don't copy & paste, but put a link to this thread.
Credits:
aru (Making the GTA IV Magic Patcher)
Anders (Telling me about the rain particles & FarClp 3500.00)
Rockstar (For making such un-optimized game)
written by Ettans @ iv-scripting.pri.ee
Update: New information in Part 2 concerning FarClp @ 3500.00
Part 1: Patching the files
First thing you should do, is download the GTA IV Magic Patcher by aru, in order to edit the files. Now, once you've downloaded and extracted it, open it and you'll see this:
If you haven't already patched your files, click on Validate Files, once done, click on Apply Patch. Now you can edit your GTA IV files and you'll also have backups of every file, with .magic as their file extension. You can revert the files anytime, by clicking on Verify and then Recover. You can now close the program.
Part 2: Changing the view-distance
That was quite easy, wasn't it? Browse to your Grand Theft Auto IV\pc\data folder and open the file named timecyc.dat. I suggest you use Notepad++ for the editing, since it'll look very messy in the default Notepad. Once you have the file open, look for the fiel called "FarClp", this controls the distance from which buildings, trees etc. are drawn at. The smaller the value, the shorter the view-distance. The default value is 1500.00, which is very big and quite pointless. To change the view-distance, simply change the value to a smaller one, I use 500.00 personally. If you're either too lazy to change it or whatever your reason is, I've attached the edited file at the bottom of this thread.
Comparison screenshots:
FarClp: 3500.00
Note: This gave me about +5-8 FPS, I suggest you try it out. I'm not entirely sure, but I think this has got something to do with PreFetch.
FarClp: 1500.00 (Default value)
FarClp: 750.00
FarClp: 500.00
In-game settings used:
Note: All screenshots were taken at the same place, time and weather, on-top of the GetALife building.
Download timecyc.dat (FarClp 3500.00)
Download timecyc.dat (FarClp 750.00)
Download timecyc.dat (FarClp 500.00)
Note: Extract it using WinRar or any similar program and place the file in your Grand Theft Auto IV\pc\data folder.
Part 3: Disabling shadows
Disabling the shadows doesn't have any significant impact on the games performance, but it might be useful for you if you're really struggling with the FPS. In order to disable the shadows, you should first download Alice by Alexander Blade. Extract the file and place the Alice folder in your main Grand Theft Auto IV folder. To disable the shadows, you can either make the script yourself, or download the one I made, using Alexander Blade's example script(s). To re-enable the shadows, simply delete the disable_shadows.lua in your Grand Theft Auto IV\Alice folder.
Shadows: Enabled
Shadows: Disabled
Note: All screenshots were taken at the same place, time and weather.
Download disable_shadows.zip
Part 4: Lowering bloom intensity
Currently there's no way to completely disable the bloom in Grand Theft Auto IV, but you can lower it's intensity. To do this, browse to your Grand Theft Auto IV\common\data folder and open the file called visualSettings.dat. Open the file and find the following names:
misc.BloomIntensityClamp.HD
misc.BloomIntensityClamp.SD
misc.BloomIntensityClamp.SD.ps3
Simply change their values to 0.00. If you don't want to edit the values yourself, download the visualSettings.rar at the bottom of this part and extract it to your Grand Theft Auto IV\common\data folder.
Bloom intensity: Default
Bloom Intensity: 0.00/Disabled
Note: All screenshots were taken at the same place, time and weather.
Download visualsettings.zip
Part 5 (Optional): Lowering the amount of rain particles
A lot of people are having trouble playing Grand Theft Auto IV with it's rainy weather, this is caused by the amount of it's particles (mostly). I can't guarantee that this will give you any performance boost, but It did make my gameplay smoother. To change the amount of rain particles, browse to your Grand Theft Auto IV\common\data folder and open the file called visualsettings.dat. Find the following fields there:
rain.NumberParticles.ps3
rain.NumberParticles
Here are the values I use myself:
rain.NumberParticles.ps3 256
rain.NumberParticles 1024
So, that concludes my Grand Theft Auto IV TweakGuide. Thanks a lot for reading, hopefully this tweak will help some people. If you want to post this on your forums/website, please don't copy & paste, but put a link to this thread.
Credits:
aru (Making the GTA IV Magic Patcher)
Anders (Telling me about the rain particles & FarClp 3500.00)
Rockstar (For making such un-optimized game)
2009年1月22日星期四
The Lost and Damned Unlocked, No scripts, but bikes, & textures!
GTA4XBX专属附加游戏已经在PC上得到解密,不过只能解开各个隐藏的物品和衣服,并不能带来剧情的增加.可毕竟有8辆新增的摩托和不少飞车党的衣服,这已经令制作游戏视频的朋友大为宽慰了!
昨天重装系统,因为GTA4的视频编辑器不断在最后时刻出错死机,今天又刷了一边索泰9800GTX+显卡的BIOS,可编辑在机场一处的视频时依然出现SMPA60错误......郁闷的消息不断,试用了一个Mod后,游戏都进不去了,哪怕我用Patch恢复也没用......nnd,现在重装整个游戏!

by Indi. from GTAforums.com
Public BETA Release (Alternatively Version 1)
Features:
Makes Niko as Johnny (Biker Jacket replaces the Sand Jacket in the Russian Shop, Johnny's
Jeans are replaced with the Jeans from the Russian Shop, and also Johnny's Leather Jacket
will be replaced by the Biker Jacket that you got from Gerry McReary's mission)
Johnny's Leather Jacket (Replaces the Biker Jacket)
2 Sets of Fingerless Gloves are also included with this mod (2 sets are normal leather gloves and a very stylish Biker glove)
DLC Bikes (Names as follows: Angel, Deamon, Diablous, Hexer, Lycan, Nightblade, Revenant,
Wolfsbane)
100% Complete Save Game
DLC Weapon Icons (Pistol, Uzi, Grenade, AK47)
New Weapon Textures
New Loading Screen (They are crap but it'll do for now, because my photoshop isn't as good)
I'll clean the topic up when I'm finished, just gotta do the Weapon textres and it's done. Screens are coming soon
Credits:
pinky (data folder and Spawn locations Info)
aru (SparkIV)
blazer30uk (Finding/unlocking the DLC Bikes)
Simkas (Johnny Klebitz)
NOTE: That some of the DLC files were actually left over and were accidentally left in IV PC, I suppose that it would be possible to get them, so I put my head to it and got it, but... the leather jacket, 1 of the fingerless gloves and weapon textures were made by me. Yes, I did get permission from the people that are all up above!
这里有一段pc-gta.info网站的视频,有点儿意思:
昨天重装系统,因为GTA4的视频编辑器不断在最后时刻出错死机,今天又刷了一边索泰9800GTX+显卡的BIOS,可编辑在机场一处的视频时依然出现SMPA60错误......郁闷的消息不断,试用了一个Mod后,游戏都进不去了,哪怕我用Patch恢复也没用......nnd,现在重装整个游戏!

by Indi. from GTAforums.com
Public BETA Release (Alternatively Version 1)
Features:
Makes Niko as Johnny (Biker Jacket replaces the Sand Jacket in the Russian Shop, Johnny's
Jeans are replaced with the Jeans from the Russian Shop, and also Johnny's Leather Jacket
will be replaced by the Biker Jacket that you got from Gerry McReary's mission)
Johnny's Leather Jacket (Replaces the Biker Jacket)
2 Sets of Fingerless Gloves are also included with this mod (2 sets are normal leather gloves and a very stylish Biker glove)
DLC Bikes (Names as follows: Angel, Deamon, Diablous, Hexer, Lycan, Nightblade, Revenant,
Wolfsbane)
100% Complete Save Game
DLC Weapon Icons (Pistol, Uzi, Grenade, AK47)
New Weapon Textures
New Loading Screen (They are crap but it'll do for now, because my photoshop isn't as good)
I'll clean the topic up when I'm finished, just gotta do the Weapon textres and it's done. Screens are coming soon
Credits:
pinky (data folder and Spawn locations Info)
aru (SparkIV)
blazer30uk (Finding/unlocking the DLC Bikes)
Simkas (Johnny Klebitz)
NOTE: That some of the DLC files were actually left over and were accidentally left in IV PC, I suppose that it would be possible to get them, so I put my head to it and got it, but... the leather jacket, 1 of the fingerless gloves and weapon textures were made by me. Yes, I did get permission from the people that are all up above!
这里有一段pc-gta.info网站的视频,有点儿意思:
2009年1月19日星期一
如何制作自己的GTA4服装之定制头盔
最近为了制作GhostRider的第二部,电脑都快抽筋了.也许是安装的软件太多,现在在输出720p画面的时候总是当机,不得不重启才行,难道最后我必须用Fraps来录?
这是题外话,今天我的任务是制作一款GhostRider专用的骑士头盔.
下面是原来的服装,一套GTA3代的夹克加一双很普通的球鞋,外加一个随机的头盔:
下面是修改过的衣服,纯黑的夹克和裤子,纯黑的运动皮鞋,深红色的头罩:
这是题外话,今天我的任务是制作一款GhostRider专用的骑士头盔.
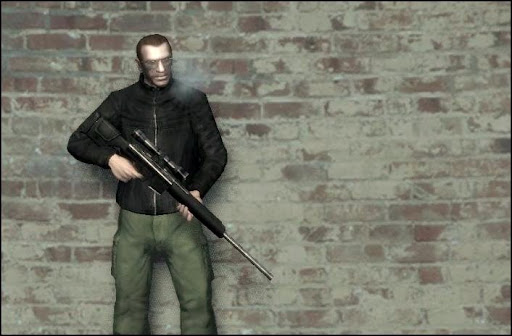
下面是原来的服装,一套GTA3代的夹克加一双很普通的球鞋,外加一个随机的头盔:
下面是修改过的衣服,纯黑的夹克和裤子,纯黑的运动皮鞋,深红色的头罩:
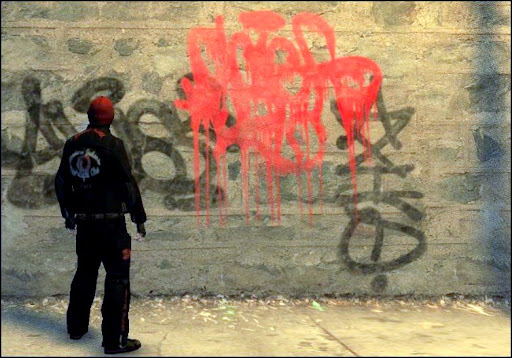
背面的图案是我一件Jack&Jones夹克上的.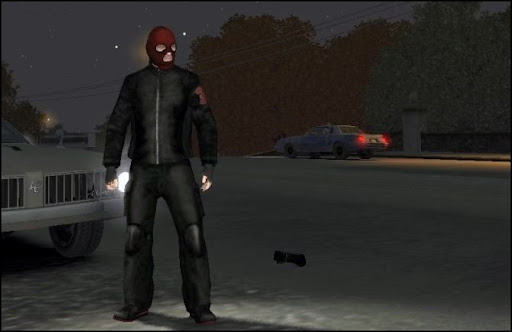
注意我还给裤子加了护膝!
配上黑色的头盔加上GR御用的黄色NRG900就是这个效果:
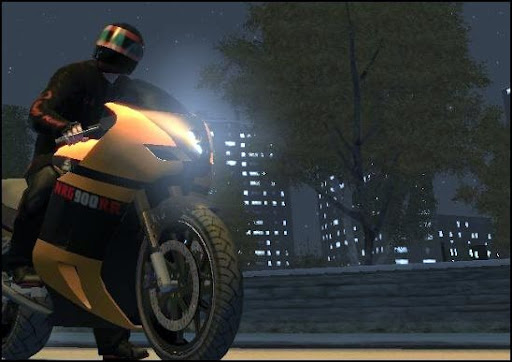
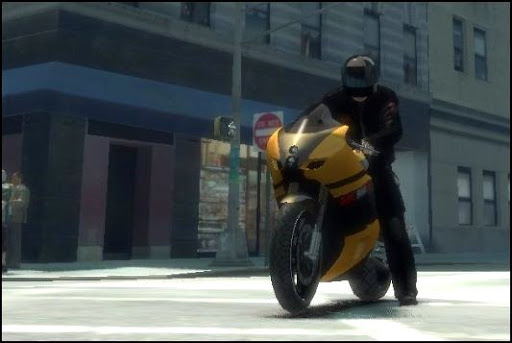
当然,这主要是截图的效果,游戏玩家都知道,游戏中,带一定的模糊,画面和静态的有所区别.日光下效果如下图:
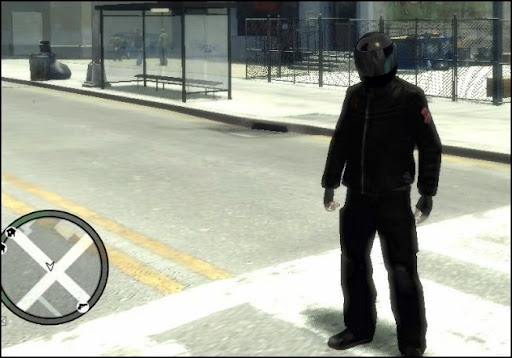
这样看来,GhostRider的外观,比原来强上了不少,至少不会像以前那样花枝招展了.黑色的低调,阴郁,压抑和红色的暴烈,激动,这些是原来的服装所无法体现的.
我不知道其他Mod玩家是怎么摆弄的,我的目的是给GhostRider换衣服,所以主要是修改Texture即素材,Model即模型方面的不太懂,不敢乱动,所以一切都要依着现有的模型基础来修改.这次我先来修改头盔!
首先,我们需要下载一个由Aru大师制作的GTA4修改软件,Spark0.54,这个软件可以提取GTA4中间所有的的纹理素材,并加以更换.然后,注意备份好几个关键的文件,以便使用不当无法挽回.
(以下请高度注意!!!)
备份你GTA4安装路径下的\Rockstar Games\Grand Theft Auto IV\pc\models\cdimages文件夹,这里面包含了你可能会改动的包括人物贴图,物体贴图,建模,素材等等原始材料,总共大概750多MB.如果你只需要修改主角的服装和头盔的话,你也可以只备份cdimages文件夹下的pedprops.img和playerped.rpf两个文件.但这些都是建议,出了纰漏还是该你自己负责哈哈!
确定上述备份工作完成,Spark下载出来是个rar压缩包(还是个zip文件我忘了),然后随意解压在某个路径下都可以,打开这个文件夹,可以看到是这样的:
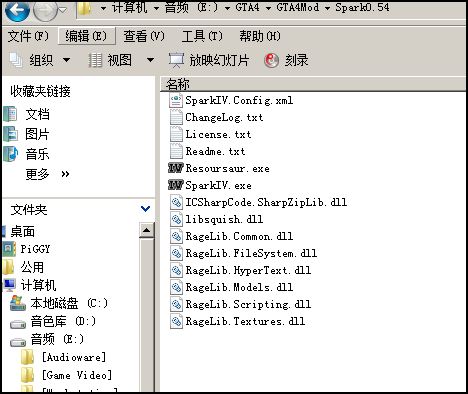
双击SparkIV.exe,会打开一个浏览器:
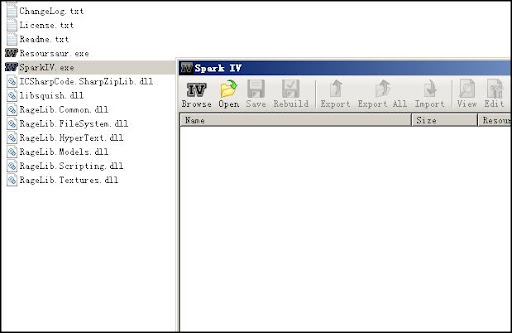
点击Browse按钮,稍等片刻,Spark会自动查找你硬盘上安装的GTA4的路径,几秒钟的时间,它就会自动打开GTA,然后看到这样的树状浏览图:
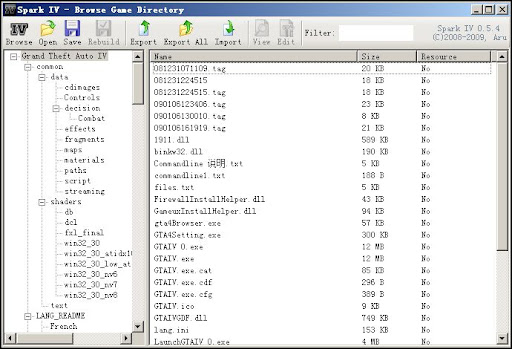
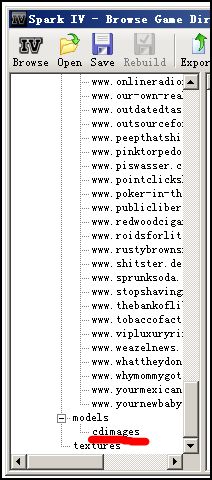
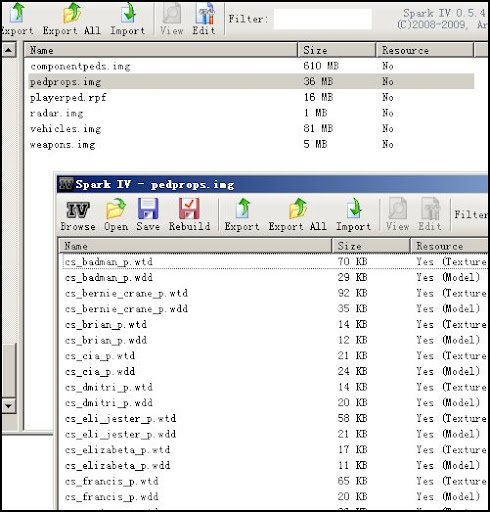
将推子拉到最下,可以看到左侧Models下面有个cdimages文件夹,这就是我们刚才备份过的那个,点击它,右边可以看到如下文件,而黄色部分两个文件就是涉及到头盔和服装的:
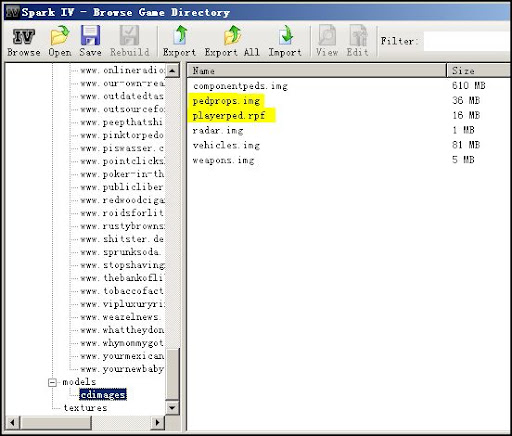
pedprops即主角周边的物体素材,比如其他的人物啊,主角的头盔啊帽子啊眼镜啊等等;playerped则是主角专用的服装如夹克啊西装啊牛仔裤多袋裤和皮鞋球鞋啊,还有被官方隐藏的截指手套啊等等.
首先制作头盔,双击pedprops文件,Spark会自动打开一个新的浏览窗口展示pedprops里面的内容:
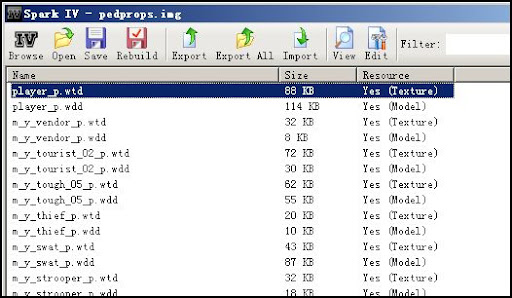
将新窗口的推子拉到最下,或者双击Name按名称排序,可以看到一个名为player_p.wtd的文件,大小为88KB,内容为Texture素材:
双击这个player_p.wtd文件或者点右上方菜单中的View图标,你将以浏览的方式观察其内容,浏览模式下,你只可以将里面的内容保存出来,而不能替换成新的内容,现在可以养成好的习惯,点击View旁边的Edit:
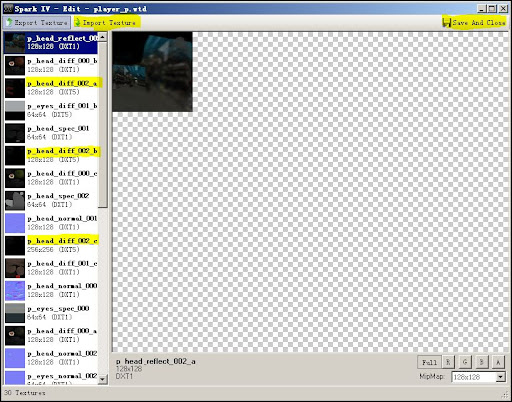
这个窗口就是以Edit编辑模式进来的窗口,黄色标记的地方为几个重要地方,一个是Import Texture导入素材,一个是Save and Close,另外三个就是主角会随机用到的三个不同颜色的头盔了(我的都是黑色,是因为我已经修改过了,原始的将会是黑色,蓝色和白色).
注意,三个头盔主角将会随机使用,所以如果希望自定三种颜色,你就需要修改三套头盔,如果只希望用到一种比如黑色,你可以修改三个以黑色为基调的图案然后分别导入和保存.更容易点,如果你懒得修改,你可以直接导出第一种黑色的素材,使用Export Texture,然后保存在随便那个地方,再选择其他头盔Import Texture,然后Save & Close即可!(红黄线即为导入和导出大概形式)
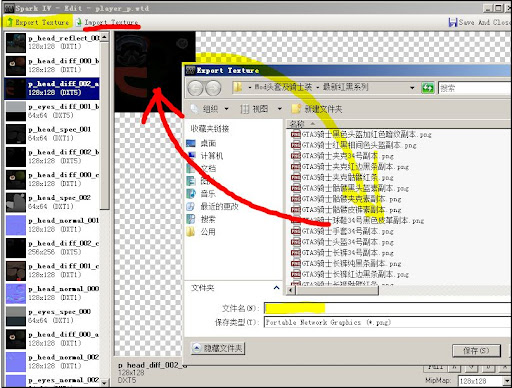
上述即是主要原理,大家现在就可以试试,将蓝色和白色的讨厌的女人头盔换成纯黑色的,以后Niko不会再显得很肉了!
希望修改现有头盔的花色的话,我们还需要进一步的加工,就拿第一种黑色头盔来说吧.首先Export,保存出来.你将看到一个PNG格式的图片,可能的话,最好用Photoshop来编辑它.
下面是用PS打开的白色头盔,因为PS的蒙版作用,可以在你不损坏原图的前提下添加各种你想要的效果.其中数字1标记的地方,为头盔与防风罩的联接处;黄线框中的2标记的地方,为头盔的主要色调和花式;红线框中的3标记处,为面罩部分,可以看到这里是透明效果,游戏中这里将只显示透明的反光而不显示任何颜色;区域4则为头盔内部装饰物如护嘴啊内枕啊等等,这些在游戏中基本上看不到,完全不重要.
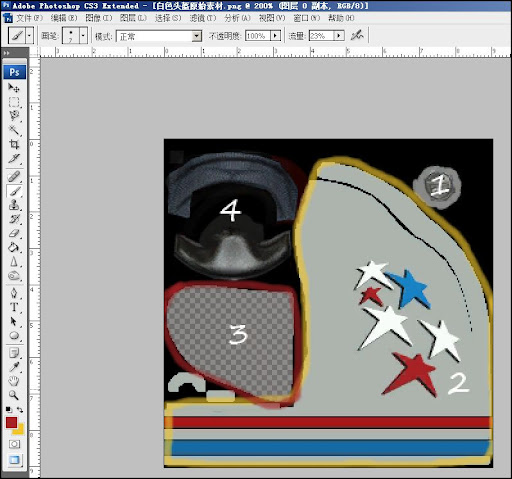
记住这些区域的位置,或者直接复制一个图层大肆的修改,你就可以定制自己的头盔了,千万注意,各个区域不要相互冲突,比如黄色部分头盔主色调和框架基本上就是游戏中头盔的整个包络,而红色部分也刚好是面罩部分,颜色不要叠加,否则会很难看.至于面罩的透明色调,完全可以用纯黑色或其他颜色替代成不透明的,一样很酷.至于PS的过程无聊而繁琐,我只展示一下大致的概念,如下:
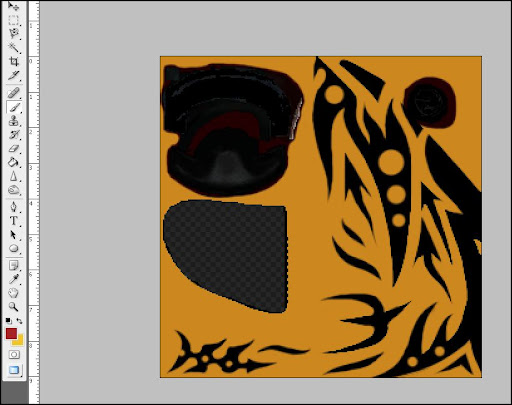
完全是我全部手绘的纹路哦!
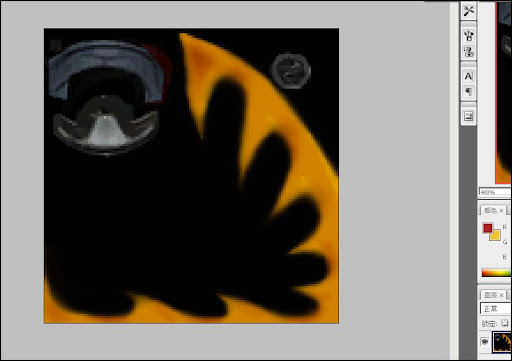
狼牙的造型!
不过上面两个造型,我最终没有在游戏中采用,太招摇了,完全不低调...我最后还是采用了红与黑的.
记住,这里的素材只是单面的,游戏中会自动复制另一面,这就意味着自制的花式可能会显示得和想象的很不一样,另外,头盔有几个部位是会自动拉伸的比如额头一处,游戏中花式会弯曲变形,因此,你必须不断的尝试,得出最满意的效果,各中步骤,我就不一一赘述了,减轻你实验的痛苦,无异于降低你最后的成就感!
另外,完成颜色花色的修改后,记住依旧保存为PNG格式的图片,再用Spark打开pedprops,找到player_p.wtd,找到你想要更换的头盔,选择Import Texture,导入这个PNG,最后Save&Close,然后逐步关闭Spark,进游戏.我常常出现修改完后,一时兴奋,都没用Spark替换就进了游戏,这个过程啊,折磨...
以下是部分新服装画面:
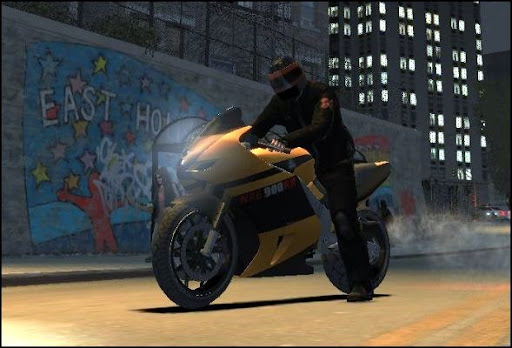
基本确定的造型!
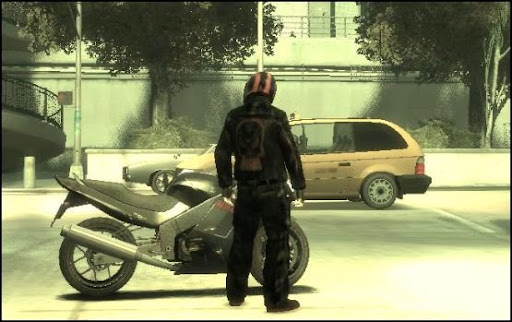
过于邋遢而被淘汰的造型!
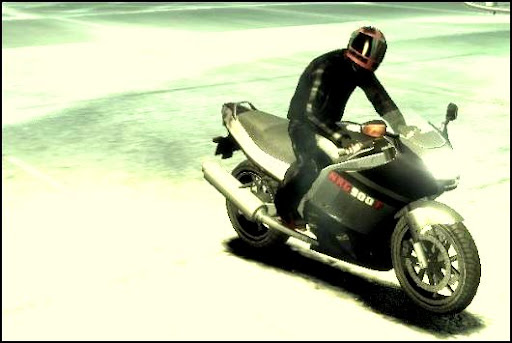
手臂大腿和头盔上的条纹太多而被淘汰的造型!
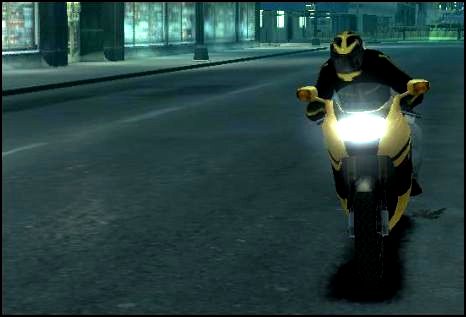
过于招摇而被淘汰的造型!
最完美的造型!
有空再写个制作衣服的吧!原理完全相同,只不过步骤更繁琐一些...
订阅:
博文 (Atom)
